Power App using Excel data
Articles:
Understanding Power Apss
https://tejasadventure.blogspot.com/2020/05/power-apps-understanding.htmlField Controls
https://tejasadventure.blogspot.com/2019/11/power-apps-field-controls.htmlCascading dropdown - Power Apps - How to implement
Connect to Office 365 Outlook
https://tejasadventure.blogspot.com/2019/11/connect-to-office-365-outlook-from.htmlExpense Tracker App: Steps for implementation
https://tejasadventure.blogspot.com/2020/05/monthly-expenses-tracker-canvas-app-in.htmlProject Management App: Steps for implementation
https://tejasadventure.blogspot.com/2020/06/project-management-app.htmlPower App using Excel data
https://tejasadventure.blogspot.com/2019/11/power-app-using-excel-data.htmlFew Samples and Knowledge sharing
Create a canvas app from scratch based on Excel data
To follow the steps in this tutorial exactly, first create an Excel file using this sample data.Copy this data, and then paste it into an Excel file.
| StartDay | StartTime | Volunteer | Backup |
|---|---|---|---|
| Saturday | 10am-noon | Vasquez | Kumashiro |
| Saturday | noon-2pm | Ice | Singhal |
| Saturday | 2pm-4pm | Myk | Mueller |
| Sunday | 10am-noon | Li | Adams |
| Sunday | noon-2pm | Singh | Morgan |
| Sunday | 2pm-4pm | Batye | Nguyen |
Format that data as a table, named Schedule, so that PowerApps can parse the information.For more information, see Format a table in Excel.Save the file under the name eventsignup.xlsx, close it, and then upload it to a cloud-storage account, such as OneDrive.ImportantYou can use your own Excel file and review this tutorial for general concepts only. However, the data in the Excel file must be formatted as a table. For more information, see Format a table in Excel.Sign in to PowerApps.
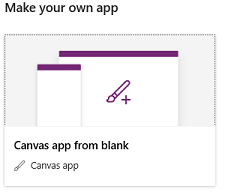
Under Make your own app, select Canvas app from blank.
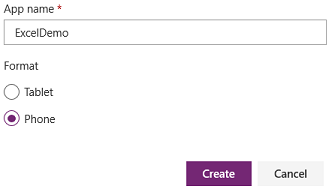
Specify a name for your app, select Phone, and then select Create.
You can design an app from scratch for phones or for other devices (such as tablets). This topic focuses on designing an app for phones.
PowerApps Studio creates a blank app for phones.
If the Welcome to PowerApps Studio dialog box opens, select Skip.In the middle of the screen, select connect to data.
In the Data pane, select the connection for your cloud-storage account if it appears. Otherwise, follow these steps to add a connection:
- Select New connection, select the tile for your cloud-storage account, and then select Create.
- If prompted, provide your credentials for that account.
Under Choose an Excel file, type or paste the first letters of eventsignup to filter the list, and then select the file that you uploaded.
Under Choose a table, select the checkbox for Schedule, and then select Connect.
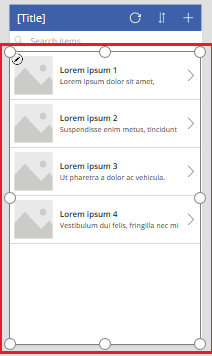
In the upper-right corner of the Data pane, close it by selecting the close icon (X).On the Home tab, select the down-arrow next to New screen to open a list of screen types, and then select List.
A screen is added with several default controls, such as a search box and a Gallery control. The gallery covers the entire screen under the search box.
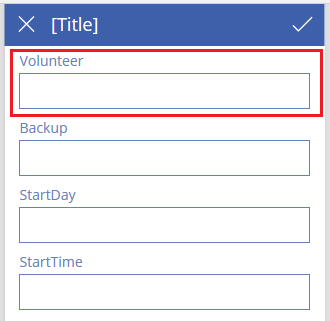
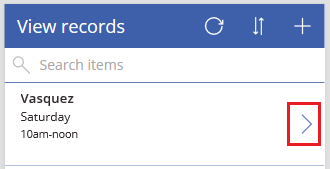
At the top of the new screen, select the Label control, and then replace [Title] with View records.

In the left navigation bar, select BrowseGallery1.
A selection box with handles surrounds the gallery.
On the Properties tab of the right-hand pane, select the down arrow for the Layout menu.
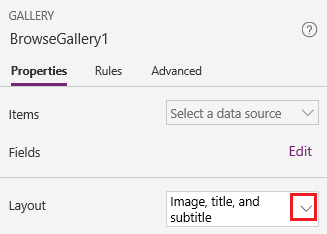
Select Title, subtitle, and body.
In the formula bar, replace CustomGallerySample with Schedule, and replace both instances of SampleText with Volunteer.
On the right edge of the formula bar, select the down arrow, and then select Format text.
The formula matches this example:
SortByColumns(Search(Schedule,TextSearchBox1.Text,"Volunteer"),"Volunteer",If(SortDescending1,SortOrder.Descending,SortOrder.Ascending))On the Properties tab of the right-hand pane, select Edit next to the Fields label.
In the Title2 box, select Volunteer, in the Subtitle2 box, select StartDay, and in the Body1 box, select StartTime.
In the upper-right corner of the Data pane, close it by selecting the close icon (X).
Users can sort and filter the gallery by volunteer name based on the SortByColumns and Search functions in that formula.
- If a user types at least one letter in the search box, the gallery shows only those records for which the Volunteer field contains the text that the user typed.
- If a user selects the sort button (between the refresh button and the plus button in the title bar), the gallery shows the records in ascending or descending order (depending on how many times the user selects the button) based on the Volunteer field.
For more information about these and other functions, see the formula reference.On the Home tab, select the down arrow next to New screen, and then select Form.
- In the left navigation bar, select EditForm1.
- On the Properties tab of the right-hand pane, select the down arrow next to Data source, and then select Schedule in the list that appears.
- Under the data source that you just specified, select Edit fields.
- In the Fields pane, select Add field, select the check box for each field, and then select Add.
- Select the arrow next to the name of each field to collapse it, and then drag the Volunteer field up so that it appears at the top of the list of fields.
In the upper-right corner of the Fields pane, close it by selecting the close icon (X).
Set the Item property of the form to this expression by typing or pasting it in the formula bar:
BrowseGallery1.Selected
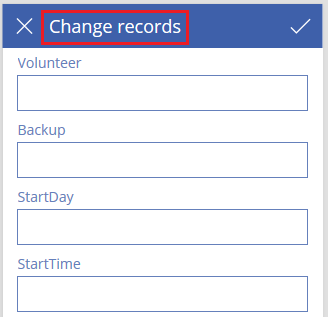
At the top of the screen, select the Label control, and then replace [Title] with Change records.
 In the left navigation bar, select the ellipsis (...) for Screen1, and then select Delete.

Select the ellipsis (...) for Screen2, select Rename, and then type or paste ViewScreen.
Select the ellipsis (...) for Screen3, select Rename, and then type or paste ChangeScreen.Near the top of the ViewScreen, select the circular-arrow icon.

Set the OnSelect property for that icon to this formula:
Refresh(Schedule)
When the user selects this icon, the data from Schedule is refreshed from the Excel file.
For more information about this and other functions, see the formula reference.
In the upper-right corner of the ViewScreen, select the plus icon.

Set the OnSelect property for that icon to this formula:
NewForm(EditForm1);Navigate(ChangeScreen,ScreenTransition.None)
When the user selects this icon, ChangeScreen appears with each field empty, so that the user can create a record more easily.
Select the right-pointing arrow for the first record in the gallery.
Set the OnSelect property for the arrow to this formula:
EditForm(EditForm1); Navigate(ChangeScreen, ScreenTransition.None)
When the user selects this icon, ChangeScreen appears with each field showing the data for the selected record, so that the user can edit or delete the record more easily.On ChangeScreen, select the "X" icon in the upper-left corner.

Set the OnSelect property for that icon to this formula:
ResetForm(EditForm1);Navigate(ViewScreen, ScreenTransition.None)
When the user selects this icon, any changes that the user made in this screen are discarded, and the view screen opens.
In the upper-right corner, select the checkmark icon.

Set the OnSelect property for the checkmark to this formula:
SubmitForm(EditForm1); Navigate(ViewScreen, ScreenTransition.None)
When the user selects this icon, any changes that the user made is this screen are saved, and the view screen opens.
On the Insert tab, select Icons, and then select the Trash icon.
Set the new icon's Color property to White, and move the new icon so it appears next to the checkmark icon.

Set the Visible property for the trash icon to this formula:
EditForm1.Mode = FormMode.Edit
This icon will appear only when the form is in Edit mode, not in New mode.
Set the OnSelect property for the trash icon to this formula:
Remove(Schedule, BrowseGallery1.Selected); Navigate(ViewScreen, ScreenTransition.None)
Next topic: PowerApp using excel excel data.
https://tejasadventure.blogspot.com/2019/11/power-app-using-excel-data.html?m=1
Next topic: PowerApp using excel excel data.
https://tejasadventure.blogspot.com/2019/11/power-app-using-excel-data.html?m=1
Comments
Post a Comment