
Connect to Office 365 Outlook from PowerApps

Office 365 Outlook
If you connect to Office 365 Outlook, you can show, send, delete, and reply to email messages, in addition to other tasks.
You can add controls to perform these functions in your app. For example, you can add Text input controls to ask for the recipient, the subject, and the body of the email, and add a Button control to send the email.
This topic shows you how to add Office 365 Outlook as a connection, add Office 365 Outlook as a data source to your app, and use this data in different controls.

Connect to Office 365 Outlook

  1. Add a data connection and select Office 365 Outlook:
    Connect to Office 365
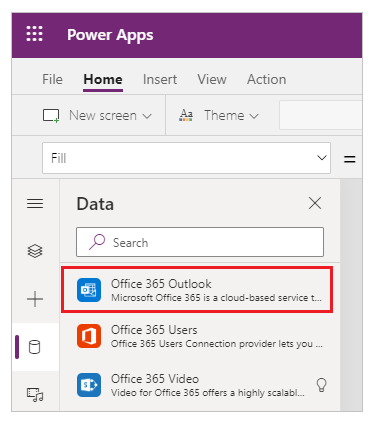
  2. Select Connect, and if prompted to sign in, enter your work account.
The Office 365 Outlook connection has been created and added to your app. Now, it's ready to be used.

Show messages

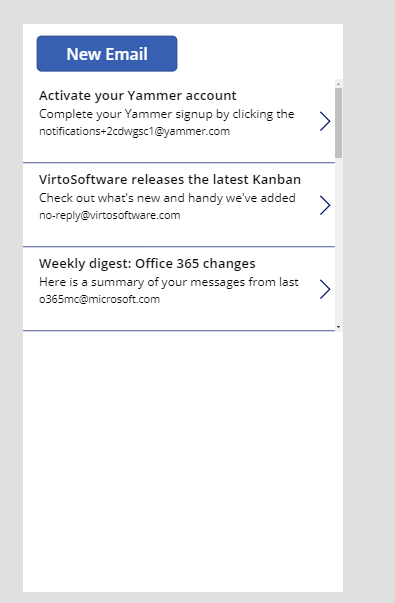
  1. On the Insert menu, select Gallery, and then select a Text gallery control.
  2. Set its Items property to the following formula:
    Office365.GetEmails({fetchOnlyUnread:false})
    After changing the settings, change Layout to Title, Subtitle, Body.
    The gallery control is automatically populated with some of your emails.
  3. In the gallery, set the Text property of the first label to ThisItem.From. Set the second label to ThisItem.Subject. Set the third label to ThisItem.BodyPreview. You can also resize the labels.
    The gallery control is automatically populated with the new properties.
  4. This function has several optional parameters available. Set the gallery's Items property to one of the following formulas:
    Office365.GetEmails({fetchOnlyUnread:false})
    Office365.GetEmails({fetchOnlyUnread:false, top:2})
    Office365.GetEmails({folderPath:"Sent Items", fetchOnlyUnread:false, top:2})
    Office365.GetEmails({folderPath:"Sent Items", fetchOnlyUnread:false, top:2, searchQuery:"powerapps"})
    Office365.GetEmails({folderPath:"Deleted Items", fetchOnlyUnread:false, top:2, skip:3})

Send a message


Create new screen, with blank one.
Now add the input fields as below
On the Insert menu, select Text, and then select Text input.
Repeat the previous step two more times so that you have three boxes, and then arrange them in a column
Rename the controls to:
inputTo
inputSubject
inputBody
On the Insert menu, select Controls, and then select Button. Set its OnSelect property to the following formula:

Office365Outlook.SendEmail(inputTo.Text, inputSubject.Text, inputBody.Text)

Move the button so that it appears under all the other controls, and set its Text property to "Send email".
Press F5, or select the Preview button (Preview button). Type in a valid email address in inputTo, and type whatever you want in the other two Text input controls.
Select Send email to send the message. Press Esc to return to the default workspace.

In allemailview screen, add Send EMail button. Add icon
Apply onSelect as formula Navigate(SendEMailScreen, ScreenTransition.None) 

In SendEmailForm screen, add icon close button and add below formula Cancel icon
Navigate(allitemsviewscreen, ScreenTransition.None)


Comments

Popular posts from this blog

Powerapps overcome 2000 item limit from any datasource

First go through delegation concept https://tejasadventure.blogspot.com/2020/05/power-apps-understanding.html In powerapps, we observe by default 500 item limit has set with in the app level for any data source. In order to overcome, we have option to set the limit of 2000 item limit maximum in the app. Now using code, MaximoFacility is my data source name contains 3000 items. ColFacilityDropdown is the collection storing the count of items from data source. We expect to see more than 2000 items. Based on StartWith function filtering the data with respective to the charectors and numbers as mentioned below. Code: Place the below code in a button on select property. Add label with code CountRows(ColFacilityDropdown) ClearCollect(ColFacilityDropdown,Filter(Filter(MaximoFacility, Status = "ACTIVE"), StartsWith( Title, "A" ))); Collect(ColFacilityDropdown,Filter(Filter(MaximoFacility, Status = "ACTIVE"), StartsWith( Title, "B" ))); Collect(ColFacilit...

Power Apps Understanding

https://tejasadventure.blogspot.com/2019/10/power-apps-we-have-1.html https://tejasadventure.blogspot.com/2019/11/power-apps-how-to-configure-using-blank.html   https://tejasadventure.blogspot.com/2019/11/power-apps-field-controls.html Report We can use people picker fields, look up fields  file attachment back next save cancel download the report and this report can be used in other system of powerapp. Add new report button - asks add from existing report Report all item view can design in the way like sharepoint list views for example. we can group it Group AND or Group OR by apply filters Canvas apps: Arrange user experience and interface design allow creativity and business use case guide how the way app wants to look like. Sources can be around 200+ ways. Majorly SharePOint, Power BI From data, From Sample From CDS From blank canvas via appSource Model driven apps: Model driven apps uses power of CDS rapidly to configure your for...

PowerApps multiselect cascading dropdown and save an item to SharePoint List

 I have one scenario as below List 1: Division List has title field List 2: District List has Title and Division Field(LookUp from Division List) List 3: Facility List has Title, District Field(LookUp field from District List) List 4: County List has Title, Facility Field(LookUp field from Facility List) Main List: Spill Report is the main list  Division Field( Look up from Division List) District Field(Look up field from District List) Facility Field(Look up field from Facility List) County Field(Look up field from County List) List Screenshots provided below can be refered for clarification. ----------------------------------------------------------------------------------------------------- PowerApps Canvas Apps In Power Apps Canvas App, We need to first design the app with the 4 respective fields Since those fields are multiselect, then it is to combo box. Generally power apps are not supported for multiselect cascasding dropdown. Refere microsoft documentation, Know Limit...